Updates

New postings as they happen

01 November 2010

PARTY OF 5, PART 3


My first and enduring love will always be Rick Stein, and so it should come as no surprise that I would turn to Rick for a dessert selection. And he has yet to fail me, think ferrero-esque crisp meringue and a chocolaty cheesecake type filling.
Otherwise known as Hazelnut Chocolate Dacquoise.

I preheated the oven to 200 degrees, and roasted 50g of whole hazelnuts for about 6 minutes, removed them from the oven and tipped them into a tea towel, rubbing the hazelnuts to remove the skins, Then blitzed them to a medium/ fine chop. And dropped the oven temperature to 110 degrees.

In a glass bowl a whipped 5 egg whites to stiff peaks and whisked in 225g of cater sugar to create a glossy, stiff meringue. The next step is to fold in all but a tsp of the blitzed hazelnuts, the create an almost ferrero type taste and aroma. Top one meringue with the reserved hazelnut, this will be the top ;ayer of the cake.

To cook the meringue, divide the mixture into 3 equal portions, forming 3 20cm circles on baking paper (to do this use a 20cm round cake tin and trace the base on baking paper with a pencil to make a 20cm circle, repeat 3 times on 3 pieces of baking paper).
Bake the meringue disks for 2 hours and then turn off the oven, letting the meringues cool completely in the oven. (the disks keep really well, so you can make these several days in advance).

To make the filling melt 100g of good quality plain chocolate, with only 50% cocoa solids (I used valrhona). To melt the chocolate, simmer a pot of water and place a glass bowl with the chocolate, over the pot, but don't let the water touch the bowl. Let the chocolate melt and add 150mls of créme fraiche, and mix well.
In a separate bowl whip 150mls of double cream until just beginning to thicken and fold through the chocolate, créme fraiche mixture. (if the chocolate mix is very runny refrigerate briefly to thicken the filling to make the dessert construction easier)


To construct the daquoise top one of the meringue disks with half the chocolate mixture, place another meringue on top and spread with the remaining half of the chocolate and finally top with the top meringue that was dusted with the extra crushed hazelnuts.

the cake is now assembled and needs to be refrigerated before serving to soften the meringue slightly whilst firming up the chocolate filling.

Rick is quite adamant that you not assemble the cake more than 2 hours before you intend to serve the dessert. But I think that if it goes into the fridge as your guests are arriving, 2 hours or more doesn't really matter, as long as you don't forget about it.

31 October 2010

party of 5, PART 2


To follow on from the terrine and feed the hungry hoards, I drew inspiration from Jaime again with a warm quail and grape salad.


To make this scrumptious quail salad preheat the oven to 180 degrees. For 5 people I used 6 quails, rubbed with olive oil and generously seasoned with salt and pepper, and then draped each quail breast with slices of speck, fat, rind and all, then set the birds aside.

Next, I drizzled a large, deep baking dish with olive oil, the leaves from a few fresh sprigs of rosemary and 3 cloves of garlic, crushed with the back of a knife.
The next step is to tear some rustic bread into the pan forming large croutons (I used a panna di casa, which is a nice dry bread with lots of air holes which allows for maximum crispiness), the recipe suggests about 4 slices of bread, but I used almost a whole loaf, it just depends on your preference, but I tell you now, You'll be kicking yourself if you skimp on the bread, the croutons are probably the best part of the entire dish.
Again, drizzle the croutons with olive oil and lay the quails on the croutons, place in the oven and bake for 35 - 40 minutes and the bacon is golden, crisp like roast pork crackle .
the quail is ready when the juices run clear, or when the leg comes easily away from the body of the bird when gently pulled.

Once the quail comes out of the oven, move the birds to a bread board and with 1 strike of the knife cut the birds cleanly in half.

Meanwhile, position the tray so it slopes, scoop all the bread crumbs to the higher end of the tray allowing any juices to fall to the lower end of the tray. Pick out the garlic cloves removing the skins and squishing the garlic into the juices. Smoosh 2 large handfuls of mixed seedless grapes into the juicy end of the baking dish, season with salt, pepper and enough red wine vinegar to make a dressing.

Add a good mix of lettuce leaves to the pan (lambs tongue lettuce, rocket, watercress etc) and the quails, toss well and place on a platter to serve.

yum, so scrumptious.

Party of 5, a french inspired family dinner. PART 1

Whenever my mum, sisters & B.I.L come over for dins I love to try something new and tasty using all the evil ingredients I don't use in my every day cooking (butter, oil, full cream dairy...)

So when the wolves descended I fed them a well planned and executed meal.
We started with home made tomato foccacia and 3 cheese foccacia, accompanied by home made pork terrine, cornichons, olives, pickled onions and mustard.

The terrine recipe was thanks to Jamie Oliver who has a surprisingly simple recipe for this rustic french staple.
I added coarsely minced speck (about 80g) and 1 large chicken liver to 500g of pork mince.
I then added a small bunch of chopped thyme, parsley and 1/4 tsp of ground cloves, 1/2 a grated nutmeg, along with 2 finely chiffonaded bay leaves, salt and pepper to taste along with handful of breadcrumbs.

The ingredients need to be mixed by hand and packed into small ceramic dishes, like large ramekin's. Then place the ramekins into a deep baking dish and pour in enough boiling water to come half-way up the edges of the ramekins, making a bain-marie.

put the dish into a preheated oven ,160 degrees for 1 hour, (the terrine is cooked when you can insert a knife into the dish and the juices run clear) then remove the baking dish from the oven and allow the terrines to cool in bain-marie. When the water is cool you can put the terrine in the fridge, just cover with cling wrap.

12 September 2010

cheesy, spinach pie


So I'm a big fan of using what's in the fridge. Consequently, as I was putting away the groceries from this weekend's shopping saga, I discovered some slightly wilting spinach ( silver beet) and some feta ( I have no idea how long it's been in the fridge, I don't remember buying it... oops!).
My brain jumps into overdrive trying to come up with healthy options for recipes and I decide to make 'kat's spanakopita'.

First, it's really important to thoroughly wash the spinach, the smallest speck of dirt in your dish and you'll definitely know it, one word... GRITTY. After washing the spinach, and removing the white vein running up the centre of the leaf, roll the leaves up and finely shred them. I like to give the spinach a few spins in the salad spinner to get rid of some of the extra liquid (spinach can be really watery). After the spinach is spun, I add it to a large bowl with 2 medium onion, diced, a pinch of salt and a decent amount of freshly ground black pepper.

Let the onion and spinach mix sit for about 30 minutes any drain off any water that leeches from the veggies. Then add some crumbled feta ( about 100g), some grated tasty cheese ( 100g) and I added some goats cheese ( just because it was in the fridge).
Mix the ingredients together and start to assemble the pie.

Preheat the oven to 180 degrees Celsius.

To make the pie you need a deep baking tray about 20cm x 15cm. Spray the tray with canola cooking spray and place 3 layers of filo pastry in the base of the tray spraying each sheet with the canola spray before layering with the next sheet of filo. After you have lined the base with 3 layers, tightly pack the spinach mixture into the dish.
Next, beat together 5 eggs until frothy and pour evenly over the pie.

Although 5 eggs may seem extravagant, the size of the pie means that per serve you are getting about 1/2 an egg. Additionally, if you are using reduced fat cheese like I do, the fat content of your food goes down and you can enjoy a second serve sans guilt.

Top the pie with another 3 layers of filo pastry, again spraying each layer with canola oil before proceeding the next layer. Score the final layer of filo with a diamond pattern and spray with more canola spray so that the party browns slightly and crisps when you bake it.

Put the completed pie in the moderate oven for 45 minutes ( depending on the size of your pie and the level of goldness on the crust of the pie, you might want to leave the pie in the oven for another 10 minutes, your call).

Super tasty pie, packed full of iron and healthy vegetables.

Give it a try, bonne chance.

sweet soy noodles


These sweet soy noodles are great for when the fridge is bulging with an over-abundance of Chinese vegetables.

To begin, as with all Asian recipes, you need to fry the aromatics. In a wok, heat some sesame oil and fry off, 2tbsp of garlic, ginger and a finely sliced red chili (large). Meanwhile pour a kettle full of boiling water over a 1kg bag of thick cut rice noodles, to soften them.

Once the aromatics have just turned in colour, add 600g of thinly sliced chicken thigh (it needs to be thigh for this recipe, as breast would become to dry and ruin the texture of the dish).
Brown the chicken, it will cook very quickly, if you have sliced it thinly.

Add a lot of bok choy/ Chinese vegetables to the wok, at least 3 large bunches (the more the better really, because it cooks down to nothing), and allow to cook until softened.

Next, you want to add the drained rice noodles, and the sauce.
To make the sauce mix together 2 tbsp of kecap manis (sweet thick soy sauce), 1 tbsp of oyster sauce, 1 tbsp of fish sauce and 1 tbsp of palm sugar. ( I like to 1 & 1/2 or double the sauce quantities). Add the sauce to the wok, turn of the heat, stir the ingredients together and allow to sit for 10 minutes before serving, this allows the noodles to absorb the sauce and intensify the flavours of the dish.

Trés tasty.

27 August 2010

really simple soup - hearty and healthy


I adapted this soup from a river cafe recipe for ribollita.
The original recipe uses dried cannelinni beans soaked overnight... who has the time?!
So here is how I made this delicious soup.
Slice some celery, including the leaves, about half a bunch. Quarter a carrot and dice into small chunks, dice about 3 small Spanish onions and finely slice 2 - 3 cloves of garlic and a small bunch of parsley stalks and all.


The original recipe is also vegetarian, However I decided to up the taste factor and fry off some lardons until slightly crisp before adding the vegetables with a pinch of salt and gently frying for about 30 minutes. keep cooking until the carrots are softened.

Meanwhile, drain a can of cannelinni beans, reserving the liquid and shred some silver beet (spinach), but make sure you only use the green leafy parts of the spinach, the white central vein the the plant can be bitter.

once the carrots are soft, add 1 can of diced tomato, all the spinach and the drained beans.
You also want to add about 2 cups of chicken sock and about half the liquid you reserved from the canned beans.

Give the soup a good stir and gently simmer for another 30 minutes.

Now this is something I never say, but I'm going to say it now, and you have to trust me, do not add any further seasoning, the soup doesn't need it.

After simmering for about 30 minutes, longer if you want, get a potato masher and mash some of the beans in the soup to change the texture from soupy to thickened and soupy.


Give it a try for a simple hearty and health meal on one of those nights when you get home from work and want something comforting but quick for dinner.

For a vegetarian alternative use vegetable stock and skip the bacon, it's still a tasty treat

08 August 2010

Back and better than ever

Its nice to know that there are people out there who keep up with my blog, I was feeling quite disillusioned for a while. I didn't think anyone was actually following my culinary adventures.
So thanks Lee-Lee for your encouragement and I'll get right on it with some new posts.
Thanks again everyone

24 July 2010

nostalgia... cassoulet


You may recall that I rave about the 'halles de hugo' and the amazing cassoulet served up in Toulouse. Well, my new best, cullinary "friend", ' Rick Stein' inspired me yet again to recreate the cullinary delights of France in my own kitchen.

Now, this is how it all started, the week previously I had superbly cooked a duck with the help of Kylie Kwong and had left overs that I had frozen. drumsticks, wings, neck... what to do with these fabulously tasty little morsels, why make cassoulet of course.

To make cassoulet I first preheated the oven to 180 degrees celcius. you really need a heavy based cast iron crock pot to cook this dish. Heat 2 tbsps of duck fat in the pan with a sprinkling of olive oil, so that the fat doesn't burn, and gently fry a whole head worth of finely sliced garlic and 1 large diced onion, cook until soft but not brown. Add 500g of pork belly cut into 3rds to the pot and cover with one and a half litres of water ( you can use a light stock, although this might be overpowering, I used half water and half chicken stock).
The flavour from this dish is subtle but built in layers so it is really important to make a hearty bouquet garni.
to make the bouquet garni, use twine to tie together celery stalks, leek, bay leaves, thyme sprigs and parsley stalks. Add this to the stock and bring to the boil.

skim any scum from the surface of the dish and then place, covered in the oven for 1 hour.

Meanwhile, I fried some toulouse sausages ( pure pork italian sausages will work just as well) until half cooked, slice diagonally into 3rds and set aside. I also pan fried the leftover duck pieces to crisp the skin and reinvigorate the flavours in the duck.

After 1 hour, take the cassoulet out of the oven and increase the oven temperature to 220 degrees celcius. Remove the bouquet garni, and add the sausage and duck to the pot, making sure to push the pieces to the bottom of the pot.

Top the lot with 2 or 3 cans of drained cannellini beans, to create an even layer over the top of the dish.

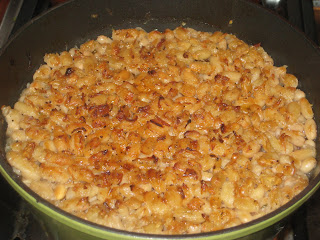
Return the cassoulet to the oven, uncovered for 45 minutes or until the beans have formed a deliciously golden brown crust on the cassoulet.

Serve hot with a glass of chilled Rosé wine and if necessary crunchy slices of baguette slathered with either butter or dijon mustard.

26 June 2010

what do you mean... we have no eggs?


I woke up on Saturday morning dreaming of poached eggs, on crusty, toasted sourdough bread (from infinity bakery in Kings Cross, soo good). Instead I found out that we had no eggs in the fridge. My first thought was, ' how is that possible, we always have eggs?', my next thought, after a thorough search of the kitchen myself was, 'what do I eat now that my dream of poached eggs has been smashed?'

Solution = Mushroom Duxelles, grace á Monsieur Damien Pignolet's cook book ' French'.
Mushrooms duxelles id usually cooked and brought to room temperature to be used as a stuffing, most often pushed into the cavity between the skin and meat of chicken breast when roasting.

However, I decided to cook my secret stash of exotic mushrooms, that I picked up for a very reasonable price from Orange Grove markets in Leichhardt, a la Pignolet.

To start, I sweat some diced eschallots in a little bit of salted butter and duck fat.
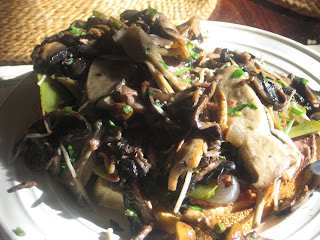
I then added some vertically sliced king oyster mushrooms, golden enoki, chenterelles and portebello's until golden brown and translucent
.

I then added some grated garlic,salt & pepper, a few passes of the micro plane of nutmeg (this adds a sweet and nutty dimension to the mushrooms, a revelation really), and some chopped parsley.


And so my breakfast dilemma was a thing of the past,
crusty sourdough toast, topped with Latvian liverwürst, polski ogorki , pickled cocktail onions and mushroom duxelles.

C'est magnifique.

new and improved shepherd's pie


So this is the story, I have been craving a traditional, ubër tasty, Aussie meat pie for ages. I finally broke down and bought one at the orange grove markets, it was alright, maybe 2 and a half stars. I was disappointed, really I thought to myself, how hard is it to make a tasty pie. So I set myself the challenge of devising a taste sensation using only the food in my freezer and leftovers from my fridge.

I bought a cut of beef traditionally used for silver side/corned beef, Using about 500g, I cubed them and tossed them in seasoned plain flour, then browned them in the pot of a pressure cooker.

Once the beef was browned, I added 1cm thick slices of pork belly, a diced onion (large), 2 carrots and 2 sticks of celery diced. I also added some garlic shoots which I chopped into 3mm slices.
I added the veggies and pork to the pot with the beef, topped it with beef stock and a few tablespoons of tomato sauce (no frills, better flavour when cooked).

All the ingredients went into the pressure cooker for 25 minutes and came out as a rich gravy with succulent, unctuous pieces of pork belly and shreds tender beef.

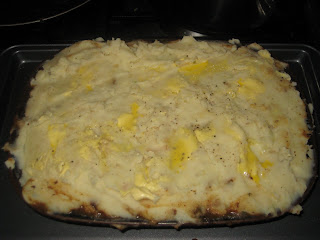
All the ingredients went into a shallow baking dish and when slightly cooled were topped with potato and celeriac mash. the concoction was bushed with a beaten egg for colour and put in a moderate oven (180 degrees) for 10 to 20 minutes depending on preference.

I served the pie hot, unaccompanied. Absolutely delicious, and definitely satisfying my craving for an ubër tasty meat pie.

06 June 2010

Broad bean and zucchini pasta


My broad bean and zucchini pasta is a great creation that satisfies my need for
the stodge of pasta whilst also being packed full of green veggies and a lovely creamy, cheesy sauce as opposed to the creaminess of a carbonara.

First of all, boil some frozen broad beans in salted water for the recommended time.
once cooked, cool under running tap water and shell the beans. this is an important step as most broad beans are packaged still in their skins, which are tough and unpleasant to eat.

Once you've completed this step, grate 2 zucchini's,
finely chop 2 eschallots, some red chilli, 1 - 2 cloves of garlic depending on taste preference, and 2 or 3 anchovy fillets.

Heat some olive oil in a deep fry pan and fry off the onion (escallots), chilli, garlic and anchovies.
then, add some lean bacon, finely sliced, until fragrant and browned. then add the zucchini and broad beans and cook off the liquid.

Meanwhile, you will have cooked some pasta (such as bavette) in salted water. add the strained pasta to the fry pan and toss with the beans and zucchini well.

To make the sauce, beat 2 eggs in a bowl, add some torn bocconcini, salt and pepper and beat the ingredients together.


Add the egg mixture to the pasta, turn off the heat under the pasta and allow the residual heat to cook the sauce, continue stirring the sauce through so that the egg does not clump.

And voila, the perfect pasta, with balance between healthy and carbs.

29 April 2010

Kat is sick ... vertigo. so no posts for a while. back soon

24 April 2010

Chinese shredded duck salad


Another Luke Mangan recipe I tried and tweaked to make my own was Mangan's shredded duck salad.

This recipe can get a little expensive, you need to buy a whole BBQ duck from your local china town, the same shop where you buy Chinese BBQ pork, succulent tastiness which no one can resist.
To start the salad you need to remove all the meat and skin from the duck carcass and chop into small pieces.

Now, the recipe calls for fried wonton skins and fried noodles, However I decided to make a healthier version of the salad since the duck is fatty enough without deep fried noodles, so i thinly slice snowpeas instead for the crunch factor.


So, to make the salad, put a big bunch of baby spinach in a large salad bowl, add 12-18 mandarin segments (I also added the segements from a ruby grapefruit for another dimension of freshness to the salad), a bunch of enoki mushrooms and 3-4 thinly sliced shallots and in my case the finly julienned snowpeas.
Add the shredded duck and dress.


The dressing for this salad is so easy to make; 3 tbsp of red wine vinegar, 1 tbsp of soy sauce and 1 of sesame oil, about the same amount of hoisin sauce, 1 tsp of sweet chilli sauce, 1 tbsp of grated ginger and a pinch of castor sugar.
I also added the fruity sauce that came with the BBQ duck.


This is a great salad, fruity and fresh with a great gamey flavour and crunch from the snowpeas

Easy, relatively quick and packed full of flavour.

Wonton Soup


I love going up to Flemington for BBQ pork and Wonton soup, so when I came across Luke Mangan's 'Sanfran Wonton soup' I got pretty excited. Although, I was a little dubious, how could the soup I have tried and failed to recreate so many times be so simple, surely the recipe must be more complex.
But no, the wontons are a delicious mix of 250g's of prawns and pork belly, 1 small can of water chestnuts and 6 - 8 roughly chopped shallots, whizzed in a food processor, until you have a 'chunky' mixture, not a smooth paste, texture is key.

Add the prawn & pork mixture to 1 tbsp of chopped coriander, 1 tbsp freshly grated ginger, 1 egg white, 1 tbsp each of Chinese wine, light soy sauce, 1 and a half tbsp of hoisin sauce and 1 tsp of Chinese chilli sauce, sesame oil, 4 good twists of a pepper grinder and a pinch of cooking salt ( about half a tsp)

To make the wontons lay out store bought wonton skins on a bench dusted with cornflour or on a sheet of baking paper, place a tsp of the mixture in the centre of each skin, brush all the edges with water and fold over the sides to form a triangle, then join the 2 corners across the middle to form the traditional wonton shape.

I like to freeze the wontons for a while before cooking them, I find that it helps to set the shape of the wontons and allows for a truer cooking time ( place wontons in boiling water, when they float cook for a further 2 minutes or so, then they're ready).

To make the soup simply bring to the boil 2 litres of good chicken stock (I used Campbell's chicken stock, in a tetra pack, it tasted really good), just before serving add thinly sliced BBQ pork, thinly sliced shallots (2-3 shallots) and enoki mushrooms.

To serve place the cooked wontons in serving bowls and top with the soup and BBQ pork.

Amazing taste, minimal effort, not exactly weight watchers healthy but it's not too bad, it all depends on the quality of pork that you use in the wontons, However if i may suggest don't be to lean with the pork, some pork fat enhances the flavours.

Try it out, as a started or add some rice/egg noodles for a main meal.

22 April 2010

Tonight

tonight I'm going to cook a little Chinese delicacy.
I'm thinking duck and mandarin salad, and homemade won ton chicken soup for a starter.
I'll fill you in tomorrow.
Cook something yummy for yourselves tonight, you can even let me know how it goes if you want

Pizza ...when the moon hits they sky like a big....


Pizza is one of my favourite things to make, packed full of flavour it's the perfect arena to experiment with different combos and on top of all that it's a huge crowd pleaser.

My tip for making pizza is a bread maker. Easy, quick and mess free (relatively speaking).
There's nothing wrong with store bought pizza bases, but for me I like to control the thickness of the dough (thin crust is my favourite).

For pizza sauce, I like to use 'five brothers' tomato and basil pasta sauce, it's neutral enough to not overwhelm the toppings but provides a good base.

I usually make enough dough for 4 pizzas. (I love leftovers, as much as I love cooking, I don't particularly want to do it every day). I roll out the dough rather thin and use some great pizza trays which are round and have holes, this allows the crust to cook from below and above making for a crisp, well cooked base.

Tip: once you've rolled out the bases, brush with a decent amount of olive oil, and leave to 'soak' in for at least 5 minutes before you put on the tomato sauce.

Now, toppings:
1: prosciutto and fresh rocket pizza
2: ham and egg
3: salami and fresh tomato
4: chicken and artichoke ( however, this time i was experimenting and just tossed some leftover Italian sausage and tonnes of garlic in the base for a cheesy garlic bread).

Here is how to make pizza:
1: prep each base with the tomato sauce, to 1 pizza add garlic.
2: slice up some mozzarella and fan equally over each base, next tear up some bocconcini and scatter over the pizzas minus the garlic pizza which is now ready to go in the oven.
3: layer one pizza with shredded ham, 1 with thinly sliced tomatoes and then salami and 1 with the prosciutto ( with the prosciutto pizza you can add the meat either before or after baking, i suggest after for a fresher taste, but it really depends on the quality of prosciutto you can get your hands on).
4: add quartered boiled eggs to the ham pizza ( about 4 eggs, hard boiled).
5: top each pizza with a scatter of grated mozzarella and tasty cheese and perhaps a little Parmesan or Pecorino, don't forget a sprinkle of seas salt and a twist of pepper. ( the only pizzas i would avoid the cheese treatment with is the garlic pizza and the prosciutto pizza with just need a little bit of freshly grater Pecorino after coming out of the oven).
6: you want to cook your pizzas in a hot oven (200 degrees Celsius, fan forced) for about 20 minutes. Turn down the oven if your pizzas are cooking too fast, if the topping cooks too fast you'll think they're ready but the base will be soggy.

Earlier I mentioned a chicken and artichoke pizza, to make this one you want to thinly slice some chicken thighs are cook off with some dried mixed herbs, salt and pepper.
slather some tomato sauce on the pizza base and sliced mozzarella and bocconcini. Spread the chicken across the base and you want an almost equal amount of artichokes in brine torn up. ( artichokes in brine, a huge jar, is really cost effective/ and soo tasty).
top with a little more cheese, salt and pepper. Toss in the oven, 20 minutes later, gorgeous, tasty pizza.

When you take the pizzas out of the oven you want to put some fresh rocket on the prosciutto pizza (if you opted not to cook the prosciutto, you'll obviously need to lay the meat over the cooked base before you add the rocket aka arugula).

Like I said, fast, tasty and great for feeding a crowd. Kat's pizzas.

20 April 2010

Quick Sausage Pasta


Despite all my good intentions, healthy eating and all, I just could not resist making one of my favourite pasta recipes for you.

This is a recipe that I rely on, especially after a long day at work, it's a great quick tasty dinner and the leftovers are great for lunches.

This recipe is from the 'River Cafe Cook Book'.

All you need is 5 good quality Italian sausages, skinned (which is actually really easy to do, when you cut the sausages apart from their string you can just push the mince out of the casings, when you do this I suggest you 'mush' the meat together, as even though the recipe asks you to break the meat up in the cooking process this is actually easier to do if you start with something resembling a slab of minced meat).

Heat a good quality, non-stick saucepan ( with lid), add some olive oil and red onions. Once the onions have cooked down a little add the sausage meat, some finely chopped fresh rosemary, 2 chopped dried chillies (small), 1 bay leaf and about 1 tsp of cooking salt.
You want to let this cook on a medium to low heat until the meat is cooked through and getting a little colour.

Meanwhile, bring a pot of water to the boil, once boiling add a generous amount of cooking salt (about 1 tbsp), don't be afraid of adding salt to your pasta water, this is where the pasta gets it's flavour.

Now, when it comes to adding oil to your pasta water, I'm conflicted, personally I don't think it does anything, but really what does it hurt.

For the pasta it recommended you use penne, but I prefer rigatoni, It's up to you.

Next, the river cafe cooks use Parmesan cheese and cream in their sauce, I prefer just to add 2 bocconcini balls, torn up which adds creaminess and cheesiness to your sauce with hopefully less calories. Once you've added the cheese take the sauce off the heat if you haven't already.

When your pasta is cooked (aldente, anything more is just mush), toss it all together in the sauce pot and set it stand for a couple of minutes so the pasta absorbs some sauce and the whole dish just thickens up slightly.

Bon Appetit